Recipe: pea pesto for crostini

IMG_6505.jpg

For my little rooftop birthday party I made platters with crostini and topping, inspired by What’s Gaby Cooking, and I also made her pea pesto as I thought it was a nice addition to the spread.

It’s delicious on a crostini on it’s own, but also with ricotta or burrata and cured ham. I like that it’s fresh and filling (for a spread) and has a hint of spice to it!

Pea pesto spread, serves 6

Adapted from What’s Gaby Cooking’s recipe.

150 g frozen petit poi, thawed

a handful fresh basil (or mint)

1/2 garlic clove

3 tbsp grated parmesan

1/2 lemon, the juice

1/4 tsp chilli flakes 

salt and pepper

Mix together all of the ingredients in a food processor or using a stick blender, but not too fine as you want a little texture. Season to taste. Serve with crostini. 

Recipe: pan con tomate

IMG_0345.jpeg

Last weekend I made tapas at home, and although I’ve made both croquetas (so yummy!) and tortilla before for some reason I had never attempted pan con tomate.

IMG_0331.jpeg

It’s very easy to make though, and you’ll figure out how to grate the tomato (yes, that’s the secret!) pretty quickly. I love this toasted bread with plenty of olive oil, a bit of garlic, tomato pulp and salt so much that I will probably incorporate it into every summer lunch and dinner from now on, tapas or not!

It just tastes like summer! Picture a sunny day by the mediterranean, glass of rosé in hand and a plate of these to tuck into with your friends. Yum!

IMG_0339.jpeg

Pan con tomate, serves 4

1 large baguette 

4 large vine tomatoes 

good quality extra virgin oil 

1 clove garlic

sea salt

Cut the baguette in half lenghtways and cut into four so you have eight pieces. Place them, cut side up, on a parchment covered baking tray. Drizzle with olive oil and put in a 180C oven for approx 10 minutes or until golden and toasted. Cut the garlic clove in half and rub the garlic, cut side down, over the bread. 

Half the tomatoes and grate them with the cut side to the grater with a plate underneath. Grate only the inside of the tomato, press the tomato to the grater so the skin remains intact. Spoon the tomato mixture onto the bread and drizzle generously with olive oil. Add salt, plate and serve with napkins. 

Recipe: caprese salad with burrata

APC_5346.jpeg

If you follow me, you know I have one strong obsession at the moment – burrata! I think it’s partly because it’s tomato season and burrata go so well with tomatoes. The creaminess of the cheese is the perfect contrast to the sweet and slightly acidic tomatoes.

One of the best – and easiest – ways to combine the two is in a simple caprese salad. All you need is four ingredients (good quality tomatoes, burrata, basil and a decent olive) and salt and pepper.

It’s perfect for lunch with some bread, as a casual al fresco starter with rosé or as part of a buffet or on little skewers as a canapé. The possibilities are endless.

Caprese salad with burrata, serves 2

2 large tomatoes, sliced (or the corresponding amount of cherry tomatoes, halved), at room temperature

1 small burrata, at room temperature

approx 10 basil leaves

2 tbsp good quality extra virgin olive oil

sea salt and black pepper

Divide the tomato slices between two plates. Tear the burrata into pieces and divide between the plates. Scatter with basil (I like to keep the leaves whole). Season. Drizzle generously with olive oil and serve straight away, maybe with some nice crusty bread. 


Recipe: bruschetta with burrata

IMG_0088

I hardly think I’m the first person to think of this combination, but since I like to pair burrata with everything tomato-y here we are. And it’s a winner! I love the classic bruschetta but the burrata adds another dimension with its creaminess and makes the dish a little more sophisticated (but also more difficult to eat with dignity).

IMG_0106

I could start every dinner party, luncheon and gathering with this and some rosé from now until August and have happy guests – I’m sure of it. Or if you want to skip the bread, make a classic caprese salad (basically the same ingredients) but with burrata instead of mozzarella. That’s what I did with the leftovers and it was delicious too! But bruschetta is great for a crowd as you don’t need plates (although they are quite handy), just serve these with plenty of napkins!

IMG_0114

Hanna’s bruschetta with  burrata, serves 4-6 as a starter or as nibbles

1 large baguette

olive oil

1 garlic clove, cut in half 

4-5 vine tomatoes

1 handful fresh basil, finely chopped 

sea salt, black pepper 

2 small burrata or 1 large, at room temperature

Slice the baguette thinly on the diagonal. Place on a parchment covered baking tray. Drizzle with oil and rub the bread with the garlic. Toast the bread in a 200C oven until golden, approx 8-10 minutes. 

Meanwhile chop the tomatoes and place in a sieve or colander to remove the excess liquid. Transfer to a bowl. Chop the garlic used for rubbing the bread and mix that in as well as the basil. Add oil, salt and pepper.

Remove the toasted bread from the oven and leave to cool slightly. Place on a plate or platter, top with the tomato mixture. Tear the burrata into smaller pieces and put some on each bruschetta. Drizzle with olive oil and top with black pepper. Serve immediately with plenty of napkins. 

Recipe: rösti with avocado, creme fraîche and lumpfish roe

APC_5501.jpeg

This recipe might be the best Scandi brunch recipe yet. Rösti with creme fraîche and lumpfish roe (or bleak roe) is a retro starter from the 1970s that I grew up with in the 1980s and I still eat it regularly now too, but for supper.

IMG_1027

By adding avocado the dish feels more current (thanks avocado toast, for that!) than retro even though half an avocado topped with creme fraîche and lumpfish roe was another popular starter back in the day, so all I’ve really done here is to combine the two.

APC_5512.jpeg

Rösti with avocado, creme fraiche, lumpfish roe and red onion, serves 2

2 large potatoes

1 avocado, sliced

2 large spoonfuls creme fraiche

2 topped tsp lumpfish roe 

1/2 red onion, finely chopped

butter and oil for frying

Peel and grate the potatoes on a coarse setting. Shape into two rounds and fry in butter and oil until golden brown and crispy on both sides. Season well. Plate the rösti and top with avocado, creme fraîche and lumpfish roe. Scatter with chopped red onions.


Recipe: green pea soup with creme fraîche and bleak roe

IMG_9980.jpeg

I know, green pea soup is nothing new. But, it’s really delicious (and nutritious!) and made even more delicious topped with creme fraîche and bleak roe.

APC_3346.jpeg

Mamma had this at a restaurant and told me how the combination really works, so obviously I took her word for it and tried it too!

APC_3348.jpeg

And now, I hope you take my word for it too. Because it really does work and makes this lovely soup even more dinner party worthy than it was before.

A note on bleak roe. I realise it’s a fairly Swedish ingredient, but any nice of fish roe or caviar would work here. It’s that slightly salty tang that works so well with the creaminess of the soup.

APC_3356.jpeg

Green pea soup with creme fraîche and bleak roe, serves 2

1 small shallot, finely chopped

1 tbsp neutral oil

300 g frozen petit pois

water to cover

a dash of concentrated vegetable or chicken stock

100 ml cream

approx 3 tbsp dry white wine

To serve:

2 tbsp full fat creme fraiche

2 tbsp bleak roe

Heat up a sauce pan and add oil. Add the onions and fry on medium heat without browning. Add the frozen peas to the pan and just about cover them with water. Bring to the boil and let it boil for a minute or two. Drain but keep the water on the side. Blitz the peas with about two small ladles of the water until you have a too-thick soup. Pour it back into the pan, add cream, wine and stock and bring to the boil again. Add more liquid if the soup is too thick. Season. With two spoons shape eggs of the creme fraîche and place in bowls. Do the same with bleak roe and place on top. Place on the table and pour in the soup.

Recipe: oysters au gratin with Västerbotten cheese and wild garlic

APC_4996.jpeg

I love oysters; both au naturelle and cooked. So you can only imagine that I felt like I was in heaven when I visited Cape Cod a few summers ago. I don’t think I ate anything other than seafood while I was there!

APC_4995

When cooking oysters at home, I think the au gratin concept is the best approach, as it’s easy, quick and seriously delicious!

APC_4990.jpegAPC_4992.jpeg

This recipe with Swedish Västerbotten cheese and wild garlic is perfect for spring (and you can of course substitute the Swedish cheese with parmesan or even cheddar) and we followed it up with asparagus (some harvested in our own garden!) and hollandaise sauce as well as prawns (cooked and smoked), homemade mayonnaise and wild garlic bread. It was quite the feast and such a treat to enjoy it with my parents! As we don’t see each other all that often we try to make it special when we are together.

APC_4993.jpeg

Oysters au gratin with Västerbotten cheese and wild garlic, serves 3 as a starter

With two more courses two oysters each was the perfect amount, but if you’re having a light main course I would recommend three oysters per person.

6 fresh oysters 

3 tbsp double cream

3 tbsp grated Västerbotten cheese

1/2 – 1 tsp Dijon mustard

approx 6 wild garlic leaves, finely chopped

salt, black pepper

To serve:

nice bread

Open the oysters with an oyster knife and discard the top shell. Cut loose the oysters but keep on the shells and place in an ovenproof dish. Mix cream and mustard in a bowl and add cheese and most of wild garlic. Season well. Spoon the mixture over the oysters, enough to cover them and sprinkle some more wild garlic on top. Place under a hot grill or in a very hot oven (225C) until bubbly and a little brown, approx 3-5 minutes. Serve with baguette or crusty bread to soak up the juices. 

Recipe: crispy rice paper with salmon, avocado and spicy mayo

IMG_9747.jpg

This is a new favourite starter of mine! I just adore the combination of crunchy fried rice paper (which is much more delicate here than in a prawn cracker) and smooth raw fish and the fresh toppings. Such a lovely mouthful with lots of subtle flavours coming together. And it pairs perfectly with a glass or two of bubbles, if you need an excuse to open a bottle.

IMG_9752.jpg

A note on raw fishÖ Most fish we buy in the supermarkets as fresh have been frozen in transport killing off any bacteria. But if you’re worried ask the people at the fish counter for sushi fish so they know you’re going to eat it raw.

Or, buy a nice piece of salmon and freeze it for 48 hours, and defrost it slowly in the fridge and you won’t even notice it’s been frozen but you know you’re safe from bacteria.

IMG_9784.jpeg

Crispy rice paper with salmon, avocado and spicy mayo, serves 2

2 sheets rice paper 

500 ml neutral oil 

80 g raw salmon

1/4 cucumber, peeled and cut into small triangles 

1/2 avokado, thinly sliced

100 ml mayonnaise, homemade or Hellman’s

1/2-1 tsp gochujang or 1-2 tsp soy sauce

fresh coriander, finely chopped

1/2 red onion, pickled 

Pour oil into a large saucepan, approx 2,5 cm high. Heat it to 180C. Fry one rice paper at the time and let it puff up. It takes approximately 5 seconds. Remove with tongs and drain on kitchen roll. Let the oil cool before you dispose of it. 

Cut the fresh salmon (or freeze it for 48 hrs and slowly defrost it, to kill off any bacteria) in 2 mm thin slices. Mix mayonnaise with gochujang (or soy sauce for a milder flavour). 

Break each puffed up rice paper in approx 5 pieces, most important is that the pieces are big enough to hold the toppings. Start adding the toppings first avocado, then salmon, followed by cucumber and radishes. Pipe or spoon on the mayonnaise (I put it in a small ziplock bag and made a tiny whole in one corner for piping). You can make both mayos and do half and half too. Top with pickled red onions and chopped coriander. Serve with napkins!

Recipe: baked Vacherin Mont d’Or

IMG_9552.jpg

Anyone else who LOVES melted cheese?! Well, then this is for you. Cheese haters, please look away now.

I’ve only had this amazing cheese (seriously, it’s HEAVEN!) in restaurants before but thought it would be a good supper for Valentine’s Day, especially since we were going to the theatre but needed to eat something afterwards.

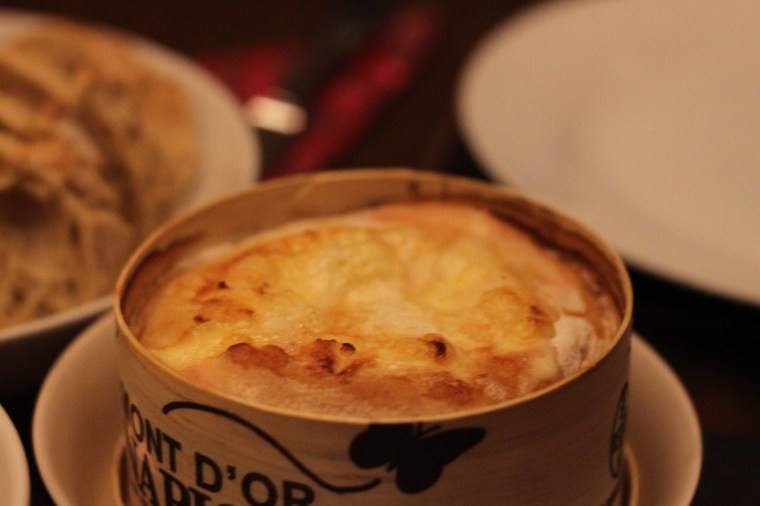
This beauty of a cheese; Vacherin Mont d’Or, is a French unpasteurised cheese and is only produced during the winter months (until March or so). The reason for this is that the same cows whose milk normally goes towards the production of Comté and Gruyère, are on a different diet in the winter and so their milk tastes different and is perfect for making this creamy dreamy cheese.

IMG_9562.jpg

IMG_9551.jpg

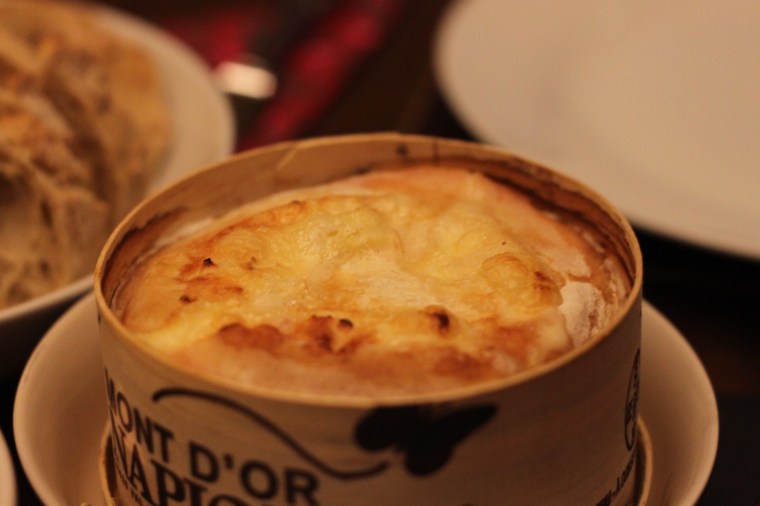
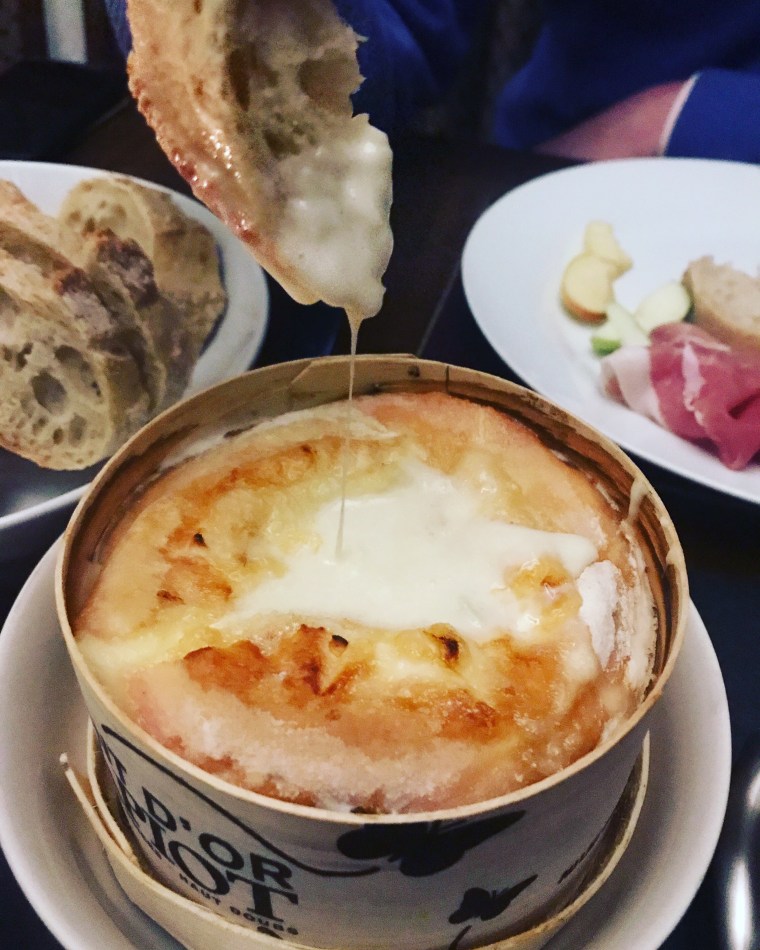
It’s quite gooey at room temperature but when baked it becomes the best cheese fondue (see below picture) and is both gooey and rich AND light at the same time. The recipe I used is courtesy of David Lebovitz and is of course completely fool proof and the only guidance one needs.

So what to eat with these cheese?! We had a lot of bits for dipping; prosciutto, cooked ham, bresaola, saucisson, cornichons, apple slices (Pink Lady and Granny Smith), crusty baguette and cold cooked new potatoes. Everything worked well, but my favourite was without a doubt the cold new potatoes. You must try it!

IMG_4606.jpeg

Baked Vacherin Mont d’Or, serves 4 as a starter or 2 as a main course

Adapted from David Lebovitz’s recipe.

1 Vacherin Mont d’Or cheese 450-500 g, at room temperature

1 clove garlic, peeled and thinly sliced

60ml dry white wine

Preheat the oven to 200ºC. Wrap the container of cheese securely in foil, making sure to enclose it so the foil goes up to the top of the outside of the container, but leave the top exposed. Set the wrapped cheese on a baking sheet.

Poke eight-to-ten slits in the top of the cheese with a paring knife and slide the slivers of fresh garlic in them. Pour white wine over the cheese, and bake the cheese until it’s very hot – it will take between 20 and 30 minutes.


Recipe: nachos with chicken and chorizo

IMG_9721.jpg

Sometimes I can really crave nachos. And most of the time I long for the ones I had at Yankee Stadium a few years ago. Although probably really processed the tasted divine!

But the next best thing are definitely homemade ones, and these with chicken and chorizo are absolutely delicious! Also, the secret is in the cheese sauce so although it takes a bit of labour it’s SO worth it!

Nachos with chicken and chorizo, serves 2

ca 150 g salted tortilla chips

75 g chorizo, cut small

1-2 fried chicken thigh fillets, cut small

oil for frying

2-3 handfuls grated cheese

Toppings:

1 batch cheese sauce

1 batch proper guacamole

1 jar creme fraiche

Garnish:

Chopped tomato

Sliced spring onions

Pre-heat the oven to 200C. Fry the chorizo in oil on medium heat until they’re crispy. Add the chicken and let it absorb the chorizo flavoured oil.

Cover the base of an oven-proof dish with a thin layer of tortilla chips, top with cheese, chorizo and chicken. Repeat with another layer. Place in the oven for the cheese to melt, approx 5-10 minutes. 

Pour the cheese sauce on top (make this while the nachos are in the oven), guacamole, creme fraîche and the chopped vegetables.